How to remove the background from an image free (and without uploading it)
Removing the background from a photo is probably the most repeated edit in the world: for an online store, a WhatsApp sticker, a profile photo or an app icon. Most popular tools solve it by uploading your image to a server, processing it there and sending back the result — which means your photo travels, is stored who-knows-how-long and is usually limited by a paywall. There's another way: process it right in your browser, without the file leaving your device.

The three methods (and when to use each)
1. AI segmentation: the fast path
A neural network trained to separate "subject" and "background" analyzes
the image and generates a mask automatically. It's the best starting
point for photos with people, pets or products on reasonably
distinguishable backgrounds. In PhotoCut Studio
this is the "AI Cutout" button (shortcut I):
the model downloads once, runs in your browser with WebAssembly and works
even offline after the first visit.
2. Magic wand: one click on the background
When the AI gets confused and the background is plain or a uniform color, the Magic wand selects by color: you click the background and that whole contiguous area of the same color is removed. Shift-click adds other areas to remove, and the tolerance sets how much color variation is accepted. It's deterministic and predictable: if the result isn't right, you undo and adjust the tolerance. If you only need to narrow down the area, "Crop area" makes a rectangular crop (it doesn't separate the background).
3. Refine brushes: fine control
No automatic method is perfect at hard edges. That's why the right workflow always ends with two brushes: keep (marks areas the cutout removed by mistake) and remove (erases leftover background). With zoom on the canvas you can work at pixel level.
The recommended workflow, step by step
- Open the photo (or paste it with
Ctrl/Cmd+Vfrom the clipboard). - Try the AI Cutout first. On most photos it's already good.
- If it fails, or the background is plain, use the Magic wand: one click on the background removes it (shift-click adds areas).
- Turn on the before/after compare to spot leftovers.
- Refine the edges with the keep/remove brushes (zoom with the wheel).
- Adjust the edge feather (1–3 px is usually natural).
- Export as a transparent PNG — or apply a color background, sticker or shadow.
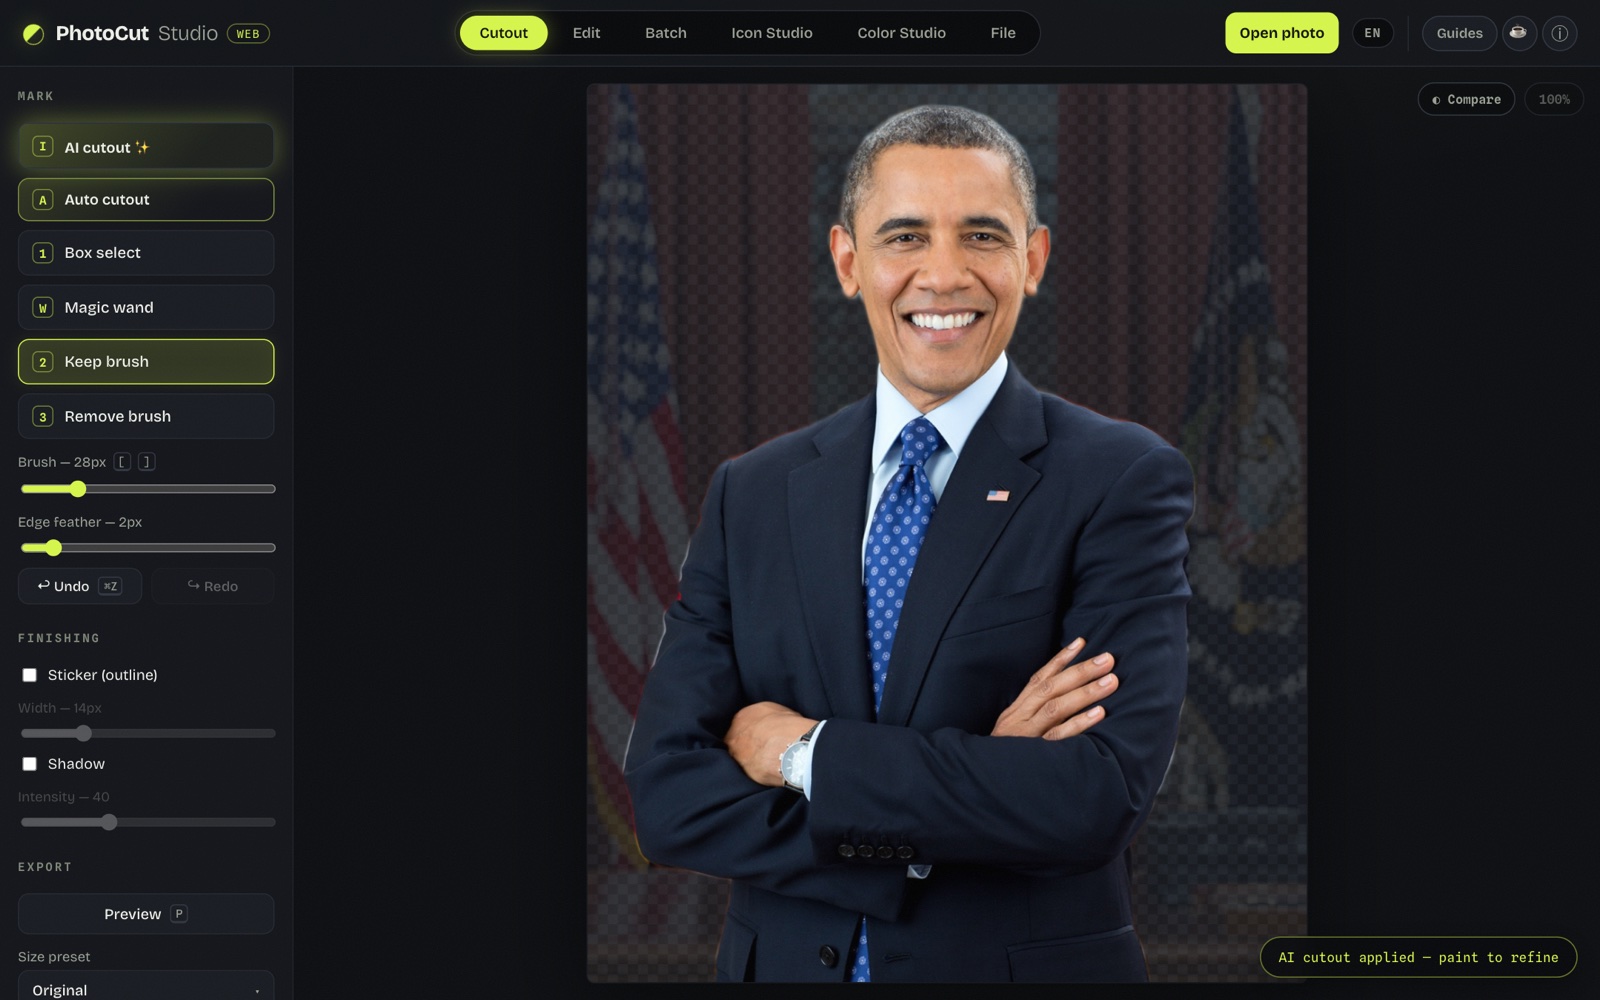
We tested it: and confirmed the photo never left the browser
We cut out a real image (1201 × 1500 px) with the AI Cutout and, meanwhile, kept the browser's network tab open. We confirmed what the local method promises: there was no upload of the image to a server — the u2netp model (4.6 MB) downloads once and from then on all the compute happens on your device.
As for the result: the automatic left the silhouette ready in one go, and we only had to run the remove brush over a fringe on the edge where the background had a tone similar to the clothing. The "after" image above is that export, with the background 100% transparent.
Tricks for hair and fine edges
- Resolution rules: cut out on the largest image you have and downscale later; the other way around loses detail.
- Moderate feather: 1–3 px of feather makes the edge natural; more than 5 px looks "cut with blunt scissors".
- Small brush on the hair: several passes with an 8–12 px brush beat one with a 40 px brush.
- Check on light and dark backgrounds: light halos only show on a dark background, and vice versa. Use the white/black preview before exporting.
Which format to export?
| Format | When |
|---|---|
| PNG | The standard with transparency: stickers, logos, icons, print. |
| WebP | Transparency with much smaller files — ideal for the web. |
| JPG | No transparency: only if you apply a color or image background. |
Common mistakes when removing a background
- Confusing "transparent" with "white". If you export as JPG (which doesn't support transparency) the gap is filled with solid white or black. To keep transparency you need PNG or WebP.
- Not checking at real zoom. At preview size, background leftovers and halos don't show; zoom to 100–200% before calling the cutout done.
- Cutting out on an already-reduced photo. If the image comes compressed or low-res, the algorithm has less contrast information to decide the edge. Always start from the largest version available.
- Overusing the "remove" brush. Running it too close to the subject eats parts that do belong to the figure (fingers, strands of hair). Several soft passes beat one aggressive one.
On your phone (Android and iPhone)
Most photos we want to cut out live on the phone, and you don't need an app for it: PhotoCut Studio runs in the phone's browser (Chrome, Safari, Samsung Internet…), takes no storage space and processes the photo on the device itself.
- Open PhotoCut Studio from the phone's browser.
- Tap to pick a photo from the gallery or take one with the camera on the spot.
- Apply the AI Cutout: it separates the subject from the background right there.
- Touch up with your finger anything left over or missing, zoomed in on fine edges (hair, fingers).
- Keep the background transparent or add a color, and download the PNG to your gallery.
Three things that change on a small screen:
- Turn the phone landscape for more room when touching up edges, and always use zoom: your finger covers exactly the detail you want to see.
- Small brush on the outlines. A big brush, on a finger, erases more than you want.
- Huge photos and little memory. Phones shoot many-megapixel photos; on a phone with little memory a very large one can take a few extra seconds. If it stutters, try a slightly smaller version: for social, profile or stickers you don't need the maximum resolution.
The cutout doesn't go anywhere else: you stay on the same phone to give it a new background, keep it transparent for a sticker or export a round avatar. Since processing is local, mobile data use is limited to loading the site (and the AI model) the first time.
Genuinely free: no watermark, no sign-up, no limit
"Free" usually comes with fine print because every cutout on a server costs the provider compute and bandwidth, and that cost resurfaces as a watermark you only remove by paying, a daily quota of cutouts, reduced resolution on the free plan, or a mandatory account to sell you a subscription later. When the cutout runs in your browser there's no per-image cost, so none of that applies here:
- No watermark: PNG, WebP and JPG come out clean, with no logo on top.
- No sign-up: no email or personal data; you open the page, add the photo and download.
- No usage or resolution limit: the same flow (AI Cutout, brushes, export) repeats photo after photo, handy for a product catalog or a sticker pack.
- Commercial use: the images you cut out and export are yours; use them in your store, social media or any project with no license restrictions on the result.
To spot a "free" tool that isn't, try it first without giving any data and check whether the full-resolution, watermark-free export sits behind a plan.
Why does it matter that the image isn't uploaded?
ID documents, photos of minors, unreleased products, client material under NDA… a good part of what gets cut out daily is sensitive information. If the tool processes the image in your browser, that question disappears: the file never leaves your device, there's no server to hack or retention policy to read. That's the underlying technical difference between PhotoCut Studio and cloud cutout services.
Frequently asked questions
Is it really free? Does it add a watermark or limit usage?
Yes, it's genuinely free: the cutout, the brush refinement and PNG/WebP/JPG export have no cost, no watermark and no usage limit.
Do I need to install anything or create an account?
No. It's a web app: it opens in the browser, asks for no sign-up or email and needs no program or extension.
Why does my photo have a color halo around the subject?
It's usually the original background "bleeding" into the edge because of feathering. Lower the feather to 1–2 px, check with the before/after compare and go over the outline with the remove brush at high zoom.
Does it work the same on Android and iPhone?
Yes. Since it runs in the browser, it works on Android (Chrome, Samsung Internet) and iPhone/iPad (Safari, Chrome) with no differences. On very old phones, very large photos may take a bit longer.
Does it use a lot of mobile data?
Very little: the photo isn't uploaded or downloaded to be processed. Data use is limited to loading the site the first time; after that you cut out several photos without spending data on each.
Can I use the result in my store or commercially?
Yes. The images you cut out and export are yours, with no license restrictions on the result.
Remove an image's background →More guides
How to cut a person out of a photo without visible edges
Automatic cutout plus brushes to isolate one or several people and keep hair and outlines clean.
How to change the background of a photo free (color or another image)
Cut out the subject once and place it on a solid color or another photo, with opacity control — no Photoshop.